Tag Archive for: homeschool

Learning & Loving It is a series featuring simple, yet fun educational activities for home learning and virtual, interactive tutoring.

LRC Learning and Loving It
 

Word Sliders

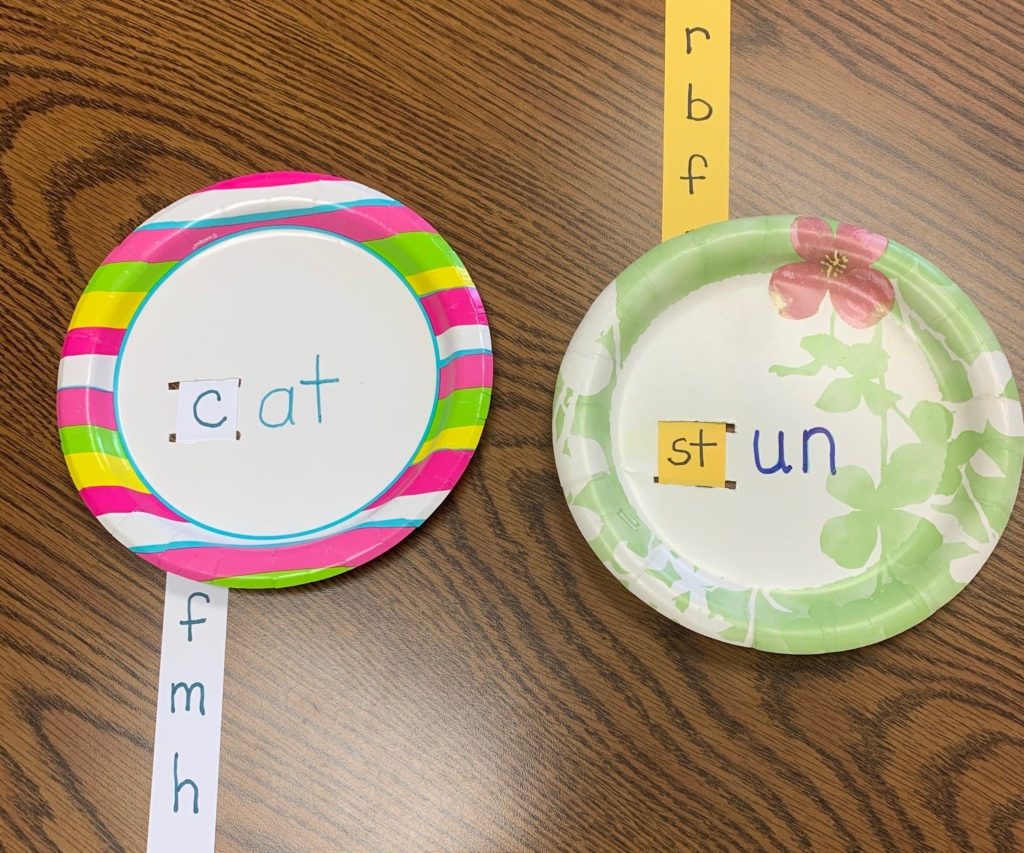
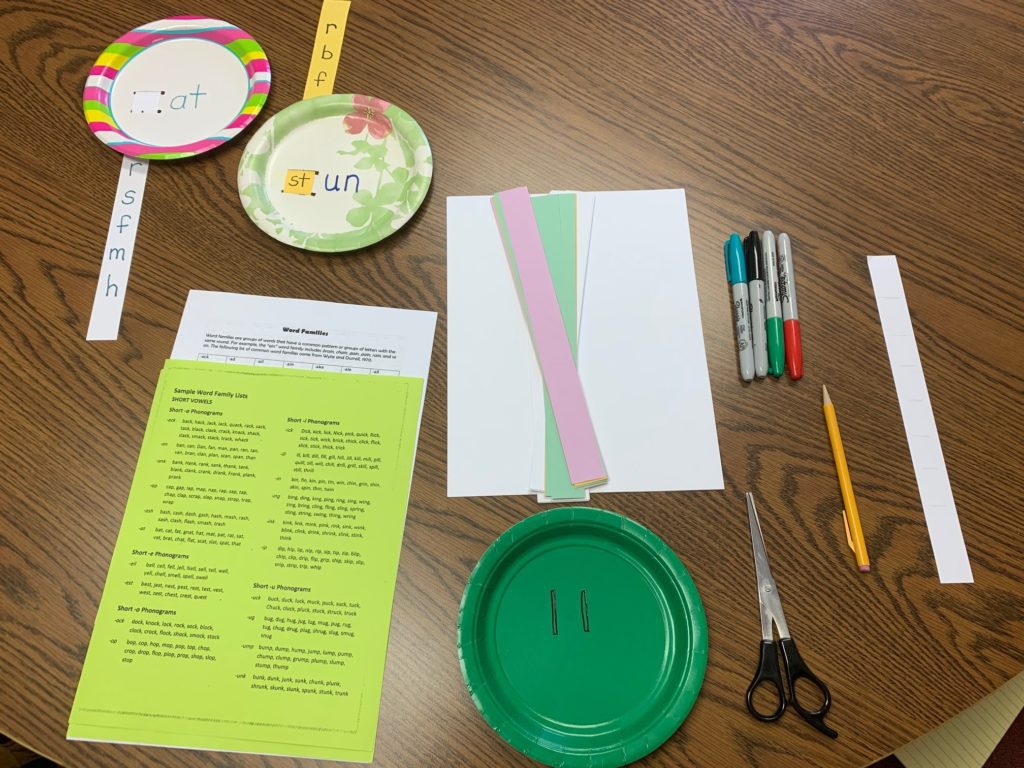
This is a fun, quick and easy way to make a hands-on game for reading practice. This concentrates on reinforcing, decoding and blending skills using word families. These words have a common sound, pattern and letter combination.
 
Learning & Loving It Word Slider
 

Supplies:

Paper plate, markers, paper/card stock, and scissors; optional: this reference sheet for word families if you’d like to use it
 
Learning & Loving It Word Slider Supplies
 

Creating your slider

1. Cut your paper into vertical strips about 1 or 1.5 inches thick.
2. Choose a paper plate (any size; smaller plates easier for smaller hands).
3. Pencil in two lines on plate in this fashion: = and cut slots with pointed scissors. This is where the strip will go.
4. Choose your word family, and write the common ending letters on the plate.
5. Prepare the strips with initial consonants and/or blends, leaving space between each one. (Parents can pencil in guidelines if these will be written by the student).
*Note: when working on blending sounds, even nonsense words can be used
6. Thread your strip through the slot. You’re ready to play!
 
Students can track how many words they can say on each strip for points and/or time themselves to beat their score.
 
The ultimate goal is to increase speed and fluency.
 
These manipulatives are inexpensive and easy to make. They’re also fun for children to play with! They can be used at home, in the car, at a restaurant or even at the beach.
 
Check to see the video demonstration on Facebook.
 
 
Click for additional Learning & Loving It activities!


Learning & Loving It is a series featuring simple, yet fun educational activities for home learning and virtual, interactive tutoring.

LRC Learning and Loving It
 

Rolling the Dice with Learning

The sound of rolling dice has brought excitement and fascination to human cultures for thousands of years. Each time you roll a pair of dice, you are keeping alive an ancient tradition that began long before recorded history.
 
Archaeologists can’t pinpoint the first human who threw dice, but they do know that dice-throwing appeared all over the populated world. The first dice throwers were not gamers; they were religious men who used the dice to tell the future. Those dice were made from fruit pits, pebbles, seashells and bones of animals.
 
Dice today can be found in all shapes and sizes–marked or unmarked. However, the most common dice are cubes with six sides or faces.
 
For centuries, dice have been used for religion, recreation and teaching. They are one of the sneakiest ways to teach number sense, arithmetic, algebra and probability.
 

Dice War

Dice War is a fun game for all ages, but especially suited for younger children. Children often move from math class to math class without a firm foundation of number sense. Why does it exist? What does it mean? How can it help? Dice War gives practice in using numbers as symbols–representations of something else. Numbers help us describe and control our world.
 
There are many variations of Dice War, but here are a couple of variations.
 

    Same and Different:
    Each player takes turns rolling four to ten dice. After rolling, the player matches the dice that are the same, then records the number of matches they found. The next player then takes their turn. The player who reaches the preset total (such as 20) first is the winner.
     
    Patterns and Sequence:
    Each player rolls the dice (two or more is fun), puts the faces of the dice in ascending or descending order, then adds the dots of each die and records the total. Again, the winner is the player with the highest score.

Pig Dice

Pig teaches strategic and critical thinking. To play, you’ll need a die, pencil, paper and two or more players. The objective of the game is to be the first player to reach 100. On their turn, each player will roll the die, count the number and record it. If the player rolls a 2, 3, 4, 5 or 6, they may choose to roll again. The catch is that if the player rolls a 1, their score from the round will be canceled and their turn will end. The player may choose to keep rolling, if they wish, as long as they don’t roll a 1. The strategy of the game is to know when to stop rolling to keep your score. This game teaches children to take turns and share while also practicing basic math skills such as counting, addition and probability. Sometimes just rolling the dice is not the best solution. The more you roll the die, the greater your chance at getting a 1.

Lu-lu Dice

Lu-lu Dice is a simple math game that originated from Hawaii. The game uses a cup and four paper discs. To make the discs, cut out four circles and divide them into fourths by drawing a “+” on each one. On the first, color one dot either in the center or in one of the quadrants. On the second, color two dots in two of the circle’s quadrants. For the third, color a dot in 3/4 of the quadrants. On the fourth, color a dot in each quadrant. On your turn, put the discs into the cup, shake them, and then dump them onto the surface area. Count your dice that are turned up. Each player gets two turns. Put your discs back into the cup, and then shake, dump and count them again. Record your score. The max score possibility for a turn is 20. The next player takes their turn. The game continues until a player reaches 100.
Incorporate probability practice by looking at how many ways a certain score can be obtained and how many turns a player would need to reach 100 if they had all the faces up on each of their tosses throughout the game. Ask players to keep track of how many points they’ll need before they reach 100.

Roll & Retell

Unlike the aforementioned activities, Roll & Retell puts a little extra excitement into the sometimes boring practice of identifying and reflecting on story elements.
 
The player rolls the die and answers the corresponding question according to their retell sheet. If the same player rolls a number for a question already answered, he or she rolls again.

Roll & Write

When asked to write something–a story, a paragraph, a poem, often we hear the excuse, “I don’t have anything to write about.”
 
Roll & Write puts the fun back into creating a tale from the imagination. Children can write their own options to correspond to the initial instructions. Using a template with prompts or creating your own, the player then rolls the dice and using a prompt with that corresponding number first to come up with the setting, then rolls again for the character, and then once more for the plot.
 
 
Enjoy discovering the fun in academics using these dice games!
 
Click for additional Learning & Loving It activities!


Learning & Loving It is a series featuring simple, yet fun educational activities for home learning and virtual, interactive tutoring.

LRC Learning and Loving It
 

Telling time with your own clock

This clock activity is a great one for teaching children how to tell time. Use it to talk about time in the future or to discuss how long it takes for something to happen with older children.
 

Supplies:

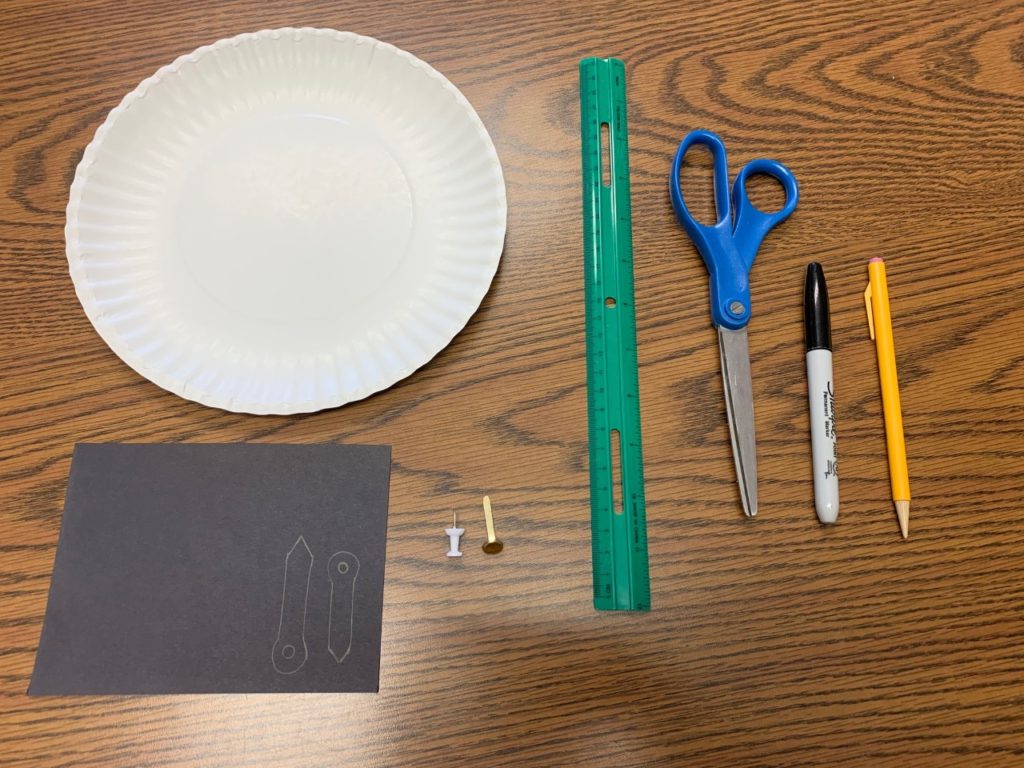
Paper plate, construction paper, brad, (optional thumbtack), ruler, scissors, marker, pencil
 
LRC Clock Supplies

Constructing your clock

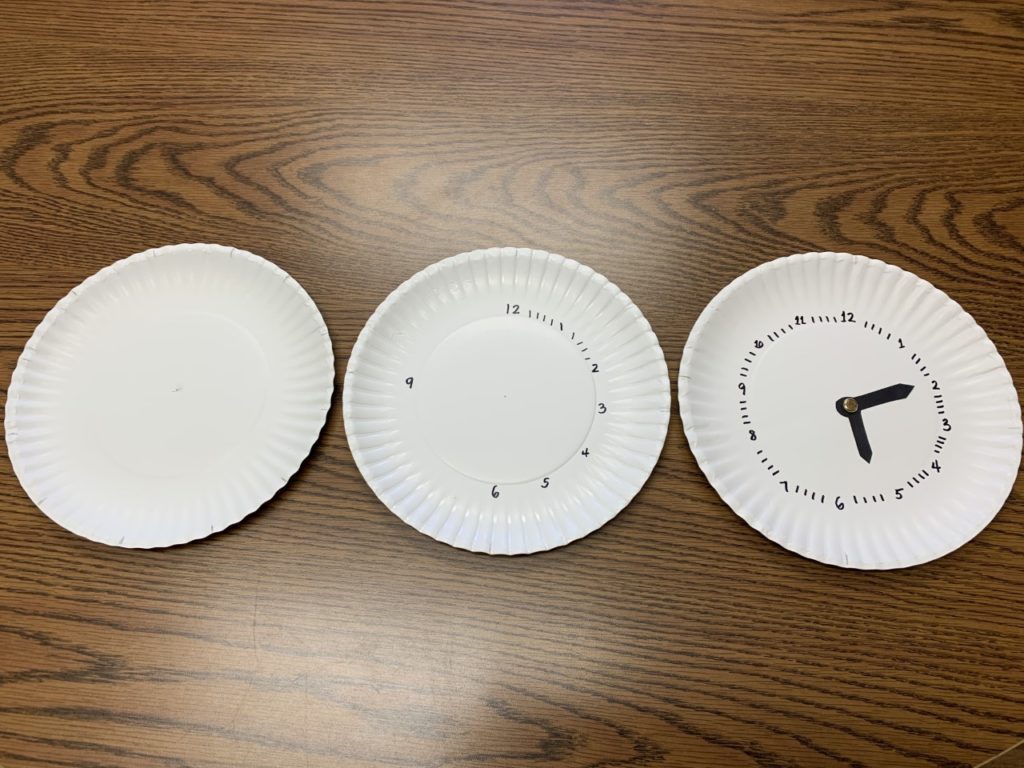
    1. Mark your paper plate in quarters (use a ruler for accuracy) by adding a dot in the center, top, bottom and each side.
    2. Write you 12 on the top dot that you made, then proceed by adding the 3 to the right side, 6 at the bottom, and 9 on the left
    3. Fill in the remaining numbers numbers in between your 3, 6, 9, 12.
    4. Mark four minute hand marks in between each number.
    5. Using the construction paper and a pencil, trace two hands for your clock. One should be shorter (hour hand), and one should be longer (minute hand).
    6. Use your scissors to cut out each hand from the construction paper.
    7. Stick your brad through each clock hand as well as through the center of the plate, then fasten.

 
Learning & Loving It Clocks

Clock activities

    1. Set the clock, and have students tell you what time it shows.
    2. Ask the student to show you a specific time such as 2:30.
    3. Try asking the student to show you a specific time in increments of five minutes to single minutes.
    3. Ask a specific time using phrases like “quarter past”, “half past”, “quarter to” or “on the hour”.
    4. Discuss different times of certain events or routines and have the student show you. Examples of this would be bed time, breakfast, lunchtime, etc.

Older children

    Have older students add or subtract time. Example: “It’s 3:00 p.m. In forty-five minutes, what time will it be?”
    “If you’re at your house at 4:00 p.m., you need to be somewhere at 4:30 p.m., and it takes five minutes to get there, what time would you need to leave?”

 
Check to see the video demonstration.
 
Click for additional Learning & Loving It activities!


Learning & Loving It is a series featuring simple, yet fun educational activities for home learning and virtual, interactive tutoring.

LRC Learning and Loving It
 

Magical Learning with Puppets


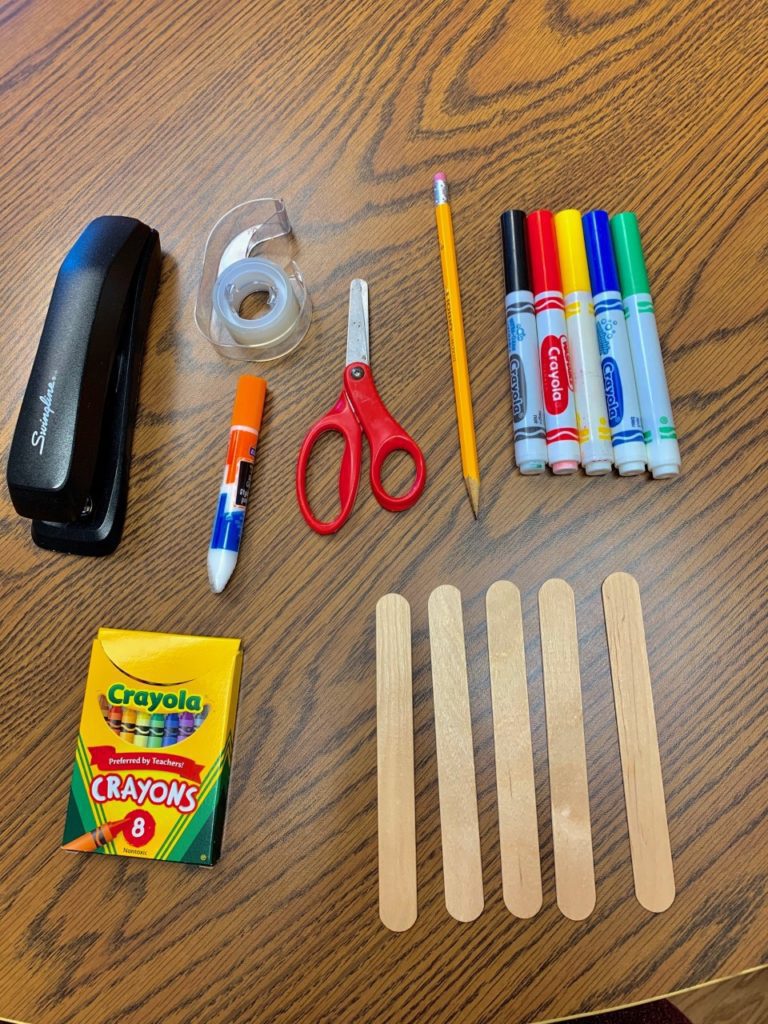
Supplies: Paper, pen/markers/crayons/paint, scissors, glue/tape/stapler, popsicle stick/tongue depressor/paint stirrer, book of choice


    1. Choose a book to read together.
    2. Draw or print the characters from the story on the blank sheets of paper. The child may decorate the characters with markers, crayons, paint, etc. if they wish.
    3. Cut the characters out.
    4. Staple, tape or glue the character to a wooden popsicle stick (or tongue depressor, paint stirrer, etc.).
    5. Repeat this step for each character that you have creating a stick puppet for each.


Using your puppets

    Share a favorite read aloud with your child and follow up with a discussion about the characters in the story. (We’re using Brown Bear, Brown Bear, What Do You See by Bill Martin, Jr. and Eric Carle). Can the child name all of the characters in the story?
     
    Explain to the child that he or she will use crayons (or markers or paint) and paper to create a special character that will be made into a stick puppet.
     
    Provide the materials. Assist the child in cutting out the finished characters. (“Scissors Snip”). Tape or glue or staple the stick onto the back of their characters to make the stick puppet.
     
    Encourage your child to use their stick puppets to act out the story or to tell their own stories. Stick puppets can even sing and dance—like in “This Old Man (he played one)” or “I Know an Old Lady (who swallowed a fly).”
     
    You may even want to create a puppet theater to use with the stick puppets. Let the child decorate and old white sheet with markers to use as a curtain or backdrop. Encourage the child to create scenes on the sheet from the story that he or she is about to tell with the stick puppets. Props can be made from tiny boxes, empty thread spools, small fabric scraps, or tiny doll pillows for beds.


About Puppets for learning

    Today, puppets can be used to teach a variety of things. Let’s take a look at some of those things.
     
    Kindergarten
    Puppets are simple effective tools for delivering information. When puppets are incorporated with play-based learning, children retain knowledge more effectively and efficiently. The puppets then become tools for sharing or retelling what they have learned or observed. Puppets are a delightful way to encourage children to exercise their language skills. Use a puppet to introduce a story. When the story is finished the puppet can discuss it with the children. The puppet might ask, “can you help me make up a new ending for my story?”
     
    Primary
    Children can benefit from puppets through oral and language skills development. When a puppet speaks, children can listen, identify, and understand different words and phrases. The act of speaking out loud is much different than thinking the thoughts in your head. So, when children are required to answer questions, the puppet can act as support—when the puppet speaks all attention is on the puppet not on the child. This gradually nurtures confidence.
     
    Middle School
    Puppets can be used to analyze characterization in a short story or novel, as well as act out a historical event. Another benefit of puppets with this age group revolves around the developing the child’s social skills. They begin learning how to interact with the different personalities of their peers. By exploring different communication techniques using puppets, students can apply the same strategies to regular conversations.
     
    Higher grades
    Students in higher grades can use puppets in a more profound way. Using a puppet “transforms getting caught in the headlight into shining in the spotlight.” They can aid in acting out Shakespeare’s Julius Ceasar, debating a complex issue, or showing a difficult process, such as a science experiment.
     
    Puppets can break down barriers and encourage students to discuss very difficult issues when found in literature or in everyday life—such as bullying, abuse, drugs, and cultural and physical differences. Many students are very uncomfortable with deeply personal topics, and puppets can be that “mask” to advance ideas or express issues without feeling vulnerable.
     
    Over the centuries, puppets have remained a powerful form of communication between people. For students, puppets are a gateway to opening up the mind and inviting knowledge in. Kids’ imaginations can run wild, and without knowing it, they are developing essential skills needed for everyday life, just as they did thousands of years ago.


Click here to see the video demonstration and reading on Facebook.
 
Click for additional Learning & Loving It activities!


Learning & Loving It is a series featuring simple, yet fun educational activities for home learning and virtual, interactive tutoring.

LRC Learning and Loving It
 

A Spin on Twister

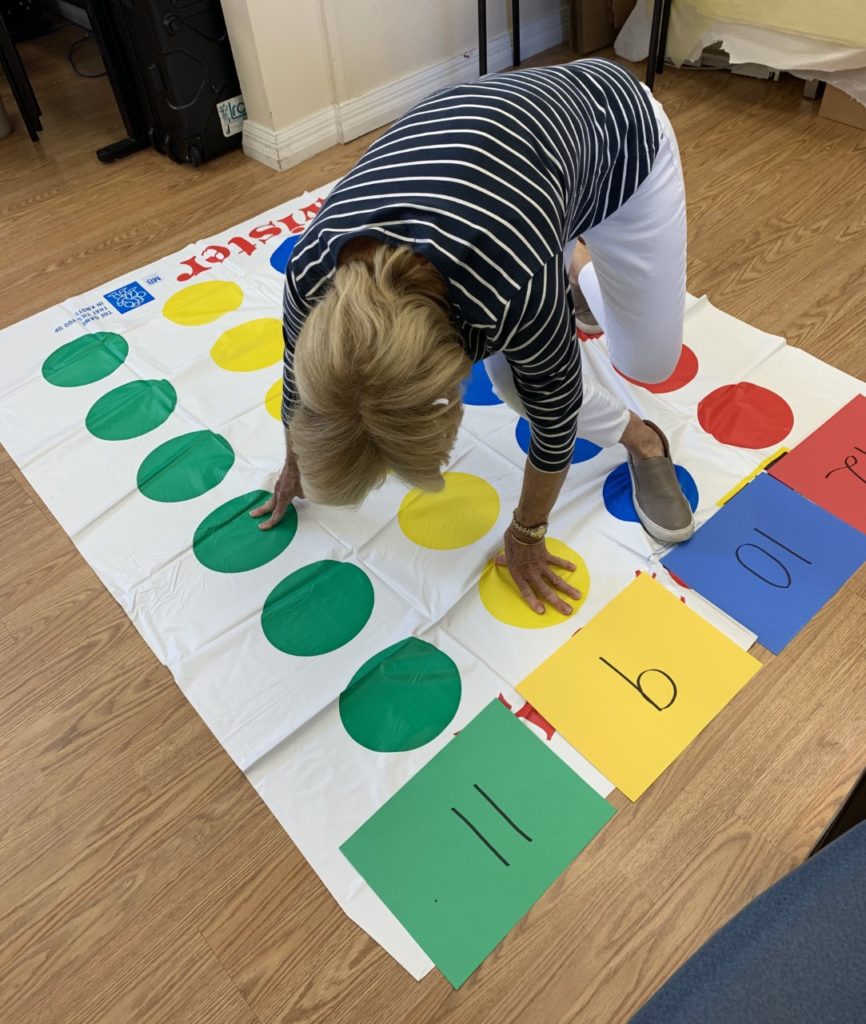
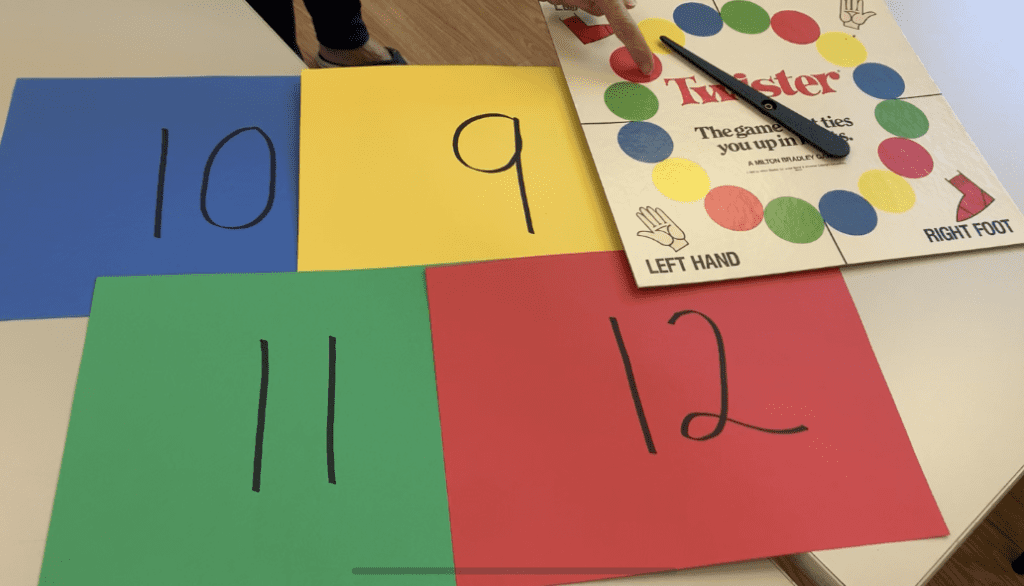
Add a layer of learning to classic games that you already own. For this activity, we’ll add a math “spin” to the classic game of Twister. When students are fully engaged, they are learning, and by using games they already love, it makes it easy to add enrichment or reinforcement of basic skills.
 

Supplies: Twister board game (mat & spinner; could also make your own with online spinner and colored paper for dots), paper & marker to write numbers
 

Putting it together

    1. Set out the game mat, and grab the spinner
    2. Grab four sheets of paper (red, blue, yellow, green to match game colors)
    3. Select four numbers for player/s to create math facts from and write one number on each piece of paper


How to Play

    1. Spin the wheel
    2. Designate a number to correspond with each color (ex. Red 12, Blue 10, Yellow 9, Green 11)
    3. Before placing a hand/foot on board, player will call out a basic math fact that corresponds to color’s number (Use: +, -, x, / depending on player’s level) (ex. 9+3=12 for red)


Variations

  • Set flashcards on each Twister dot; Student will answer the fact before placing their hand/foot on board
  • For intermediate or middle school students, ask them to create an equation with three numbers (ex. for red: (5×3)-3=12 )

 
Click for additional Learning & Loving It activities!


Learning & Loving It is a series featuring simple, yet fun educational activities for home learning and virtual, interactive tutoring.

LRC Learning and Loving It
 

Rainbow Retelling Bracelet

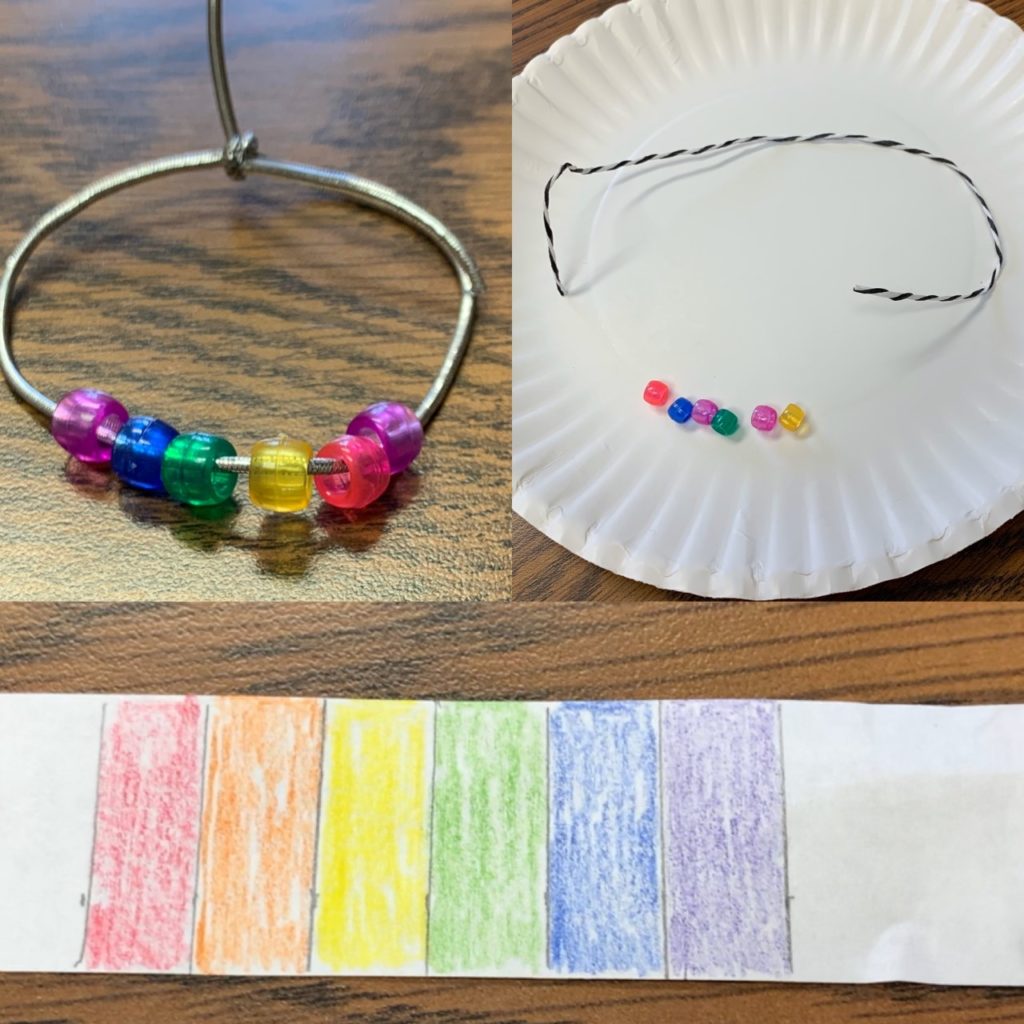
This colorful bracelet will help a child retell the story they just listened to or read and can be used by tutors, teachers and parents. (Adapted from Growing Book by Book)
 

Supplies: String or plastic lacing, 6 stringing beads (red, orange, yellow green, blue, purple would work best)  
optional- a strip of paper and crayons to color a rainbow if you do not have beads/string


LRC retelling bracelet

Putting it together

    1. Measure the string or lacing for the correct size to fit the child’s wrist.
    2. String the bead by placing the colors in rainbow order (red, orange, yellow, green, blue, purple)
    3. Tie the string together with a knot.
     
    If you don’t have string or beads, you may make a bracelet with paper and crayons, colored pencils or markers. Just cut the strip to fit their wrist, and color lines across the width to match the colors of the rainbow. (See image above)


Retelling the story

    Slide one bead over at a time, or put a finger on one colored line, beginning with red. Use prompts to ask questions with each bead.


Prompts

    R= Ready to hear a retelling of the story? The characters in the story are…
    O= On to where the story took place (setting)
    Y= You have to hear the problem… (something that happens that needs to be fixed)
    G= Get ready for a few more details… (major events)
    B= Better start bringing it to a close and telling you how the problem was solved…
    P= Picking my favorite part is easy. It was when…

 
Click for additional Learning & Loving It activities!


Learning & Loving It is a series featuring simple, yet fun educational activities for home learning and virtual, interactive tutoring.

LRC Learning and Loving It
 

“Egg-Citing” Egg Activities for Reading & Math

Easter may be over, but don’t pack away those plastic eggs! We have “egg-citing” ideas for tutors, teachers and parents to use for learning.
 

Supplies: Plastic eggs, Sharpie marker, optional word family list (see attachment)

Spinning Eggs

Spinning Egg

    For skills in both and reading and math

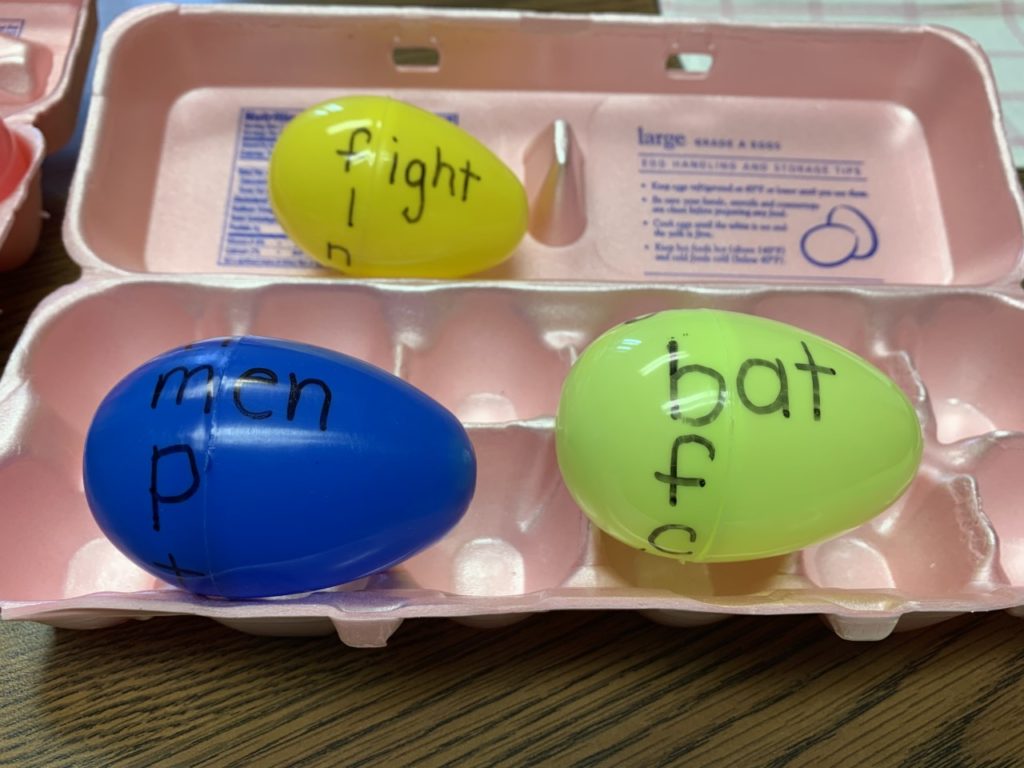
  • For reading practice, make these eggs using word families to build new words at the egg is turned.
  • Ex: the “_at” family and can use letters like “b” to make “bat” or “c” to make “cat”.
  •  
    Optional activities with spinning eggs:

  • Make eggs using math fact families such as “5+4=” and “3+6=” “9”
  • For competitive students, time them saying the words and have them try to beat their personal best


Break-Apart Eggs

Break Apart Eggs

    For skills in both reading and math

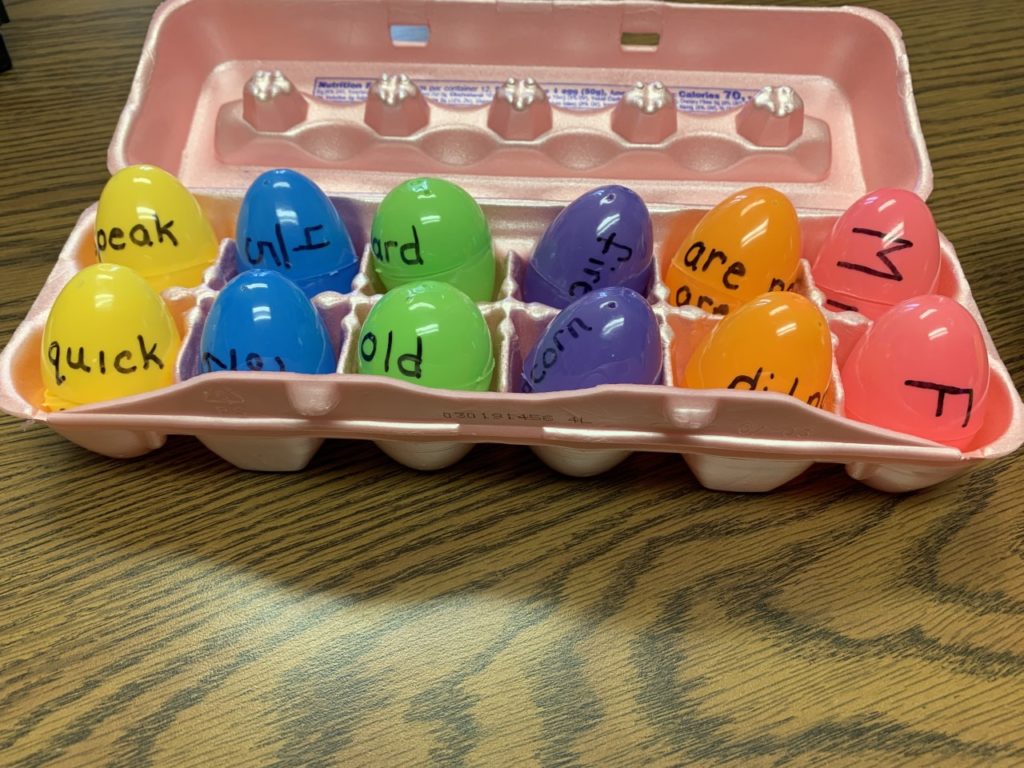
  • With this activity, you’ll write a word (or letter) on the top half and a word (or letter) on the lower half.
  • Ex: upper/lower case letters, synonyms/antonyms, compound words, contractions, math facts, number recognition, etc.
    Then, you’ll break the eggs apart and either mix them up or hid the halves and have students match them to put them back together again.

 
Download your word family list here.
 
See the demonstration on Facebook.
 
Click for additional Learning & Loving It activities!


Learning & Loving It is a series featuring simple, yet fun educational activities for home learning and virtual, interactive tutoring.

LRC Learning and Loving It
 
Beach Ball Toss
 
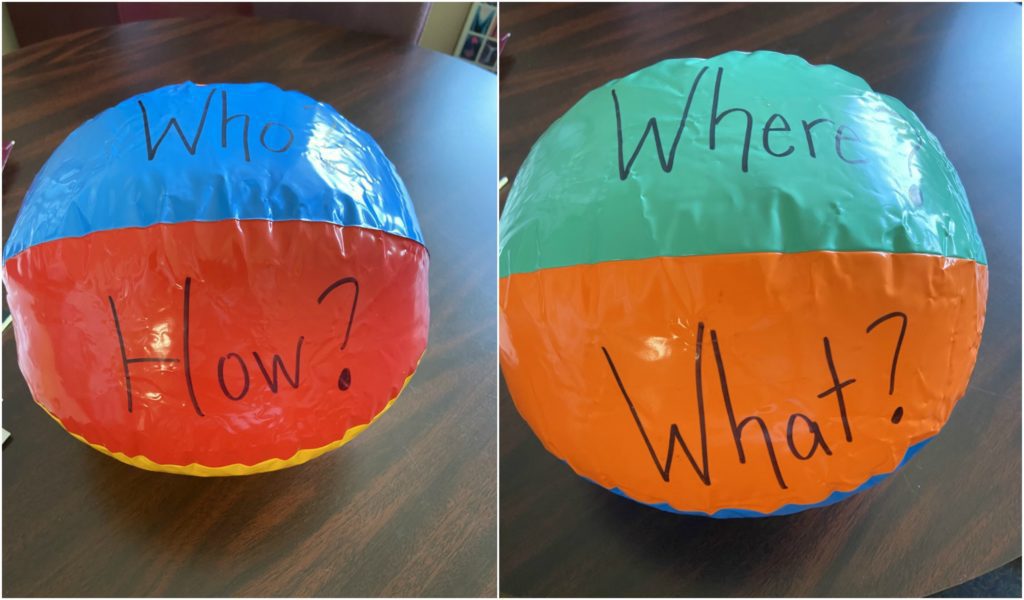
1. Take a medium or small beach ball; Inflate and write the following on each panel or section of the ball with permanent marker:

    a. Who?

    b. What?

    c. Where?

    d. When?

    e. How?

    f. Why?

 
2. Read the whole or a portion of a text—fiction or non-fiction.
 
3. The Player tosses the ball into the air and catches it with both hands. He or she then looks to see the questions touched by each thumb, selects one, and answers the question. For more than one player, the ball is tossed to another player who after answering the question tosses the ball to the next player.
 
4. Points can be awarded to determine a final score.
 
Note: If the player is playing alone and the answer is unknown or thought to be incorrect, the player may refer to the text or passage to find the correct answer. This game works well with a variety of different subjects and applications.
 

  • Beach Ball Toss Instructions
  •  
    Tried it? Share how it worked for you or add any suggestions on our Facebook page: LRCPolk.
     
    Click for additional Learning & Loving It activities!


    Learning & Loving It is a series featuring simple, yet fun educational activities for home learning and virtual, interactive tutoring.

    LRC Learning and Loving It
     
    LRC Math Bingo
     
    1. Create the Bingo components:

    master card, player’s card, individual pieces, tokens (can be markers, bottle caps, paper clips, poker chips, pennies, etc.)

    2. Set Rules: Bingo can be—

      a. Straight: 5 spaces are covered with a token in a straight line—across, down, diagonal

      b. Full House: Every space is covered with a token

      c. Picture Frame: Spaces in outside borders are covered with a token

      d. Other variations, such as the cross, the X.

    3. To Start: Player places token on Free Space; caller places individual pieces in a container, such as a Solo Cup, and thoroughly mixes.

    4. Caller draws an individual piece, and player places token on the matching space on his player’s card.

    5. Player shouts out “Bingo” when pre-determined spaces are covered
     
    Note: This game works incredibly well with children (and adults) of all ages– sight vocabulary words for the younger child; math facts and algebra problems or science for the middle school student; or foreign languages or history facts for the older student. It can be played with partners or groups. Students have fun creating their own cards and pieces.
     

  • Download a blank BINGO board here.
  • Click here to download a sample BINGO card. 


    Tried it? Share how it worked for you or add any suggestions on our Facebook page: LRCPolk.
     
    Click for additional Learning & Loving It activities!


  • Learning & Loving It is a series featuring simple, yet fun educational activities for home learning and virtual, interactive tutoring.

    LRC Learning and Loving It
     

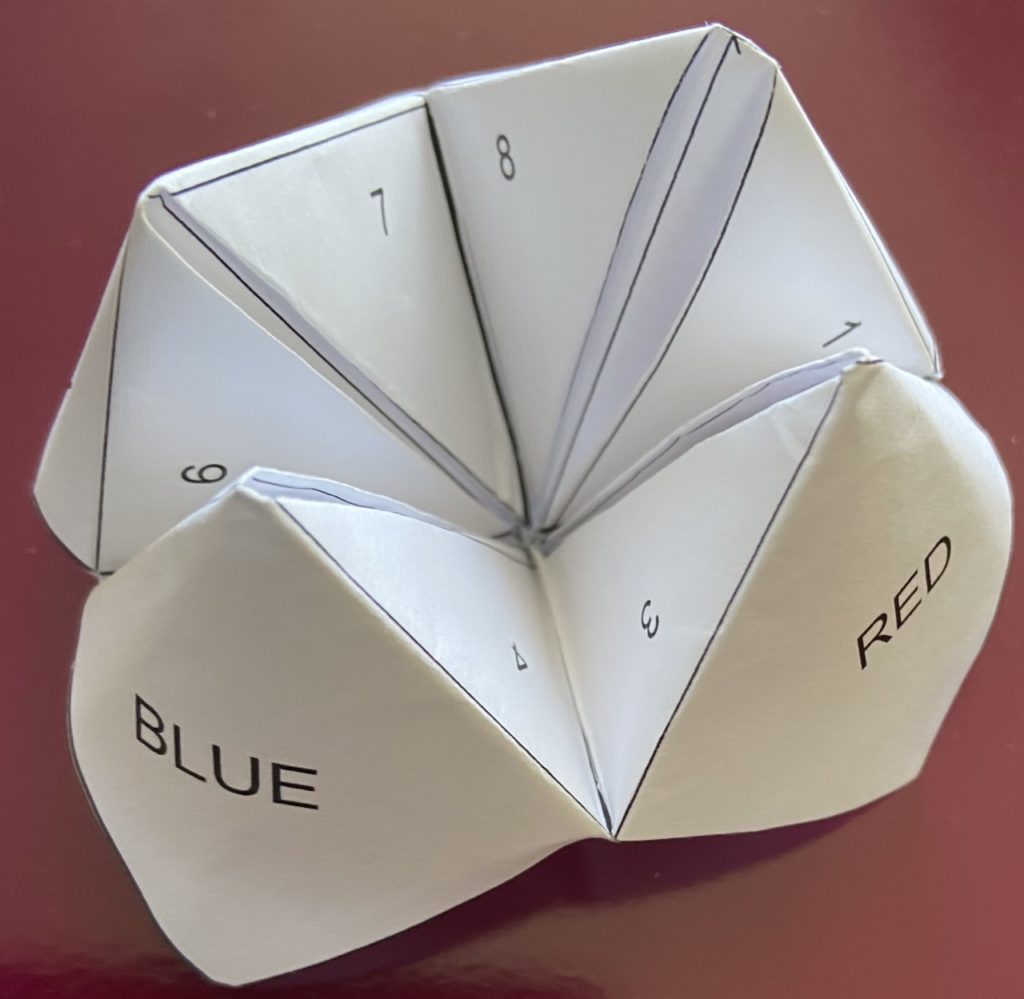
    Step by step instructions for using a cootie catcher (or fortune teller)

    LRC Cootie Catcher

       
      1. Take a single piece of paper, fold, and label–Click for diagram
       
      2. Poke your thumbs and forefingers under the flaps.
       
      3. Bring your fingers together so the Cootie Catcher forms a peak.
       
      4. Pick a color and spell it out, moving the catcher vertically and horizontally with your fingers for each letter.
       
      5. Pick a number and count it out, moving the catcher vertically and horizontally with your fingers for each number.
       
      6. Pick a number and lift the corresponding flap and answer the question.
       
      7. Repeat steps 3-5.

     
    Note: Cootie Catchers are great for reading comprehension questions, vocabulary words and definitions, formulas, math facts, geography, science, and history.


    Tried it? Share how it worked for you or add any suggestions on our Facebook page: LRCPolk.
     
    Click for additional Learning & Loving It activities!